Jumat, 20 Maret 2020

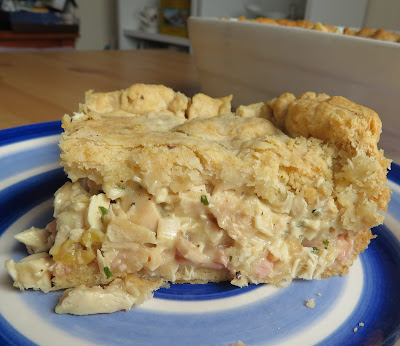
Chicken & Ham Pie


This is a recipe I meant to share with you yesterday but with all of the upset of Todd's fall and everything, I never got around to it. Normally I would make a better presentation of it as well, showing you what you can serve on the side, but again with Todd's fall, that just didn't get done!


Nevermind, its the pie you are here to see.  And this is one heck of a tasty pie!  Its a great example of making something delicious from what you have at hand to use!


Chicken & Ham Pie 

I love the crust for this.  It uses a fat combination of lard and butter, along with flour, baking powder, onion salt and milk.  Normally I would use all milk, but we are rationing to make our milk last longer and so I used half milk half water, and you know what?  It was every bit as delicious as always. 


It is a lovely tender and flaky crust, and the onion salt gives it a bit of a savoury flavour that works really well with the fillings.


I had leftover chicken from my roast chicken that we had the other day so I used some of that.  I also had a package of deli ham slices in the refrigerator that needed using. Chicken and ham are a very popular pie combination over here, so I thought why not!  Use it up, wear it out, make it do or do without!


It does use a tin of cream of chicken soup in the fillings also,  but no worries if you don't have any.  Make a thick cream sauce, using 2 TBS flour, 2 TBS butter, 240ml/1cup of chicken broth and 240ml/1 cup of milk. 


Melt the butter in a saucepan, whisk in the flour, cook for a few minutes, then whisk in the broth and milk.  Cook, stirring constantly until it thickens and then cook for a few minutes longer.  Taste and adjust the seasoning as desired.  Let it cool completely before you use. You don't want to melt the fat in the pastry.


There are three layers of pastry in this.  A bottom crust.  A middle crust between the chicken and the ham fillings.  A top crust to tuck it all in nicely. Brush it with a bit of milk, if desired and bake.


That pastry is heavenly and the fillings are pretty tasty also.  If you have any pastry trimmings, this is what my mom used to do with them.  She would roll them out, spread them with butter, fold in half and then cut into squares.  We would enjoy them with soup. Oh so tasty instead of crackers and bread and no waste of anything.


Like I said, normally I would have shown you what to serve with this tasty pie.  But today you will have to settle with my recommendations.  Todd likes mashed potatoes with his, with peas and gravy. (He is so British.)  You could also have oven chips.


The Canadian in me prefers coleslaw or a salad with mine.  Yesterday I had pickled beets, due to a lack of salad ingredients in the house. 


Truth be told, this pie would be great even on it's own!  Tina stopped by yesterday to pick up her CFM printouts on the BOM I had been doing for her and I gave her two slices to take home for her and Tony's supper.  She was most appreciative and Todd and I will have the rest for our dinner today!  I don't think anyone will be complaining that it is leftovers!

Chicken & Ham Pie

Chicken & Ham Pie

Yield: 6
Author:
This is a simple recipe in which a little bit of meat goes a very long way. The pastry is heavenly and altogether this is quite, quite delicious.

Ingredients:

For the chicken filling:
  • 250g cooked chicken, cut into small bits (2 cups)
  • salt and black pepper to taste
  • 1 tsp parsley flakes
  • 1/2 (295g)tin of condensed cream of chicken soup (10 3/4 ounce tin)
For the ham filling:
  • 250g sliced deli ham chopped (about 8 ounces)
  • salt and black pepper to taste
  • 1 tsp parsley flakes
  • 1/2 (295g)tin of condensed cream of chicken soup (10 3/4 ounce tin)
For the pastry:
  • 115g of lard (4 ounces)
  • 115g butter (4 ounces)
  • 420g plain flour (3 cups)
  • 4 tsp baking powder
  • 1 tsp onion salt
  • 160ml milk (2/3 cup) (I used half milk, half water)

Instructions:

How to cook Chicken & Ham Pie

  1. To make the ham filling, mix all of the ingredients together in a bowl. Set aside.
  2. To make the chicken filling, mix together all ingredients in a bowl. Set aside.
  3. To make the pastry, sift the flour and baking powder into a large bowl. Stir in the onion salt. Drop in the fats and rub them in with your fingertips until your mixture resembles fine breadcrumbs with a few pea sized bits. Stir in the milk with a fork to form a soft dough. Divide into three bits, with one bit being larger than the other two. This will be the bit you use to line the bottom and sides of the baking dish.
  4. Preheat the oven to 190*C/375*F/ gas mark 5. Have ready a 7 by 11 inch rectangular pie baking dish.
  5. Roll out the largest bit of the pastry on a floured board, using a floured rolling pin, to a size large enough to lie the bottom and sides of the pie dish. It should only be about 1/4 inch thick. Line the dish with this. Spread the ham filling on the bottom of the pastry.
  6. Roll out another bit of pastry large enough to just cover the ham filling. It should also be 1/4 inch thick. Place on top of the meat. Spread the chicken filling over top.
  7. Roll out the remaining pastry large enough to cover the chicken filling with a bit of overhang to tuck in the sides. Place over the chicken filling and tuck in the edges all around. Crimp the edges. Brush with a bit of milk and slash to vet the top.
  8. Bake in the preheated oven for 35 to 40 minutes until golden brown and bubbling. Serve hot and cut into squares. This is delicious!

Did you make this recipe?
Tag @marierayner5530 on instagram and hashtag it #EnglishKitchen
Created using The Recipes Generator


Normally I would bake a few things sweet/wise for the weekend, but I am trying to make my flour last a bit longer until I know I can get more.  I had to bake us a loaf of bread yesterday as well as we had run out.   I hope you are all doing well!  We can do this!   I know we can! 👍👍👍


Rabu, 18 Maret 2020

Classic Roast Chicken & Gravy


We were supposed to have the Missionary Sisters over for dinner this week. Unfortunately because of the Corono Virus our plans changed, and we were not able to have them.  That made me a bit sad as we had not had the missionaries over for dinner for a while and I had been really looking forward to seeing them, but better safe than sorry.


I had bought in a medium sized free range corn fed organic chicken as a treat.  I found a recipe on the BBC Good Food Site, and then added my own twist to it.


We like Roast Chicken in this house. We always enjoy it on the first day, and then I use the leftovers to make sandwiches or a casserole, and the bones for soup.


A roasting chicken is always a good economy.  At least that's my opinion.  Just buy the best chicken you can afford to buy and  then cook it properly. Your reward will be at least three decent meals out of it. Our chicken today was nice and plump.


Garlic, thyme and lemon work with chicken to form a trinity of delicious flavours. In this instance, the chicken itself is filled with lemon halves and  sprigs of thyme, and then roasted on a bed of vegetables and garlic. I also add some butter to the cavity along with some seasoning.


The outside of the chicken  is rubbed well with more butter and then seasoned generously with salt and pepper.


Just plunk it into the oven and leave it to roast for about an hour and a half, and you will have a nicely roasted bird.


You can make a really delicious gravy from the drippings, once you have strained out the roasted vegetables.  The roasted vegetables actually add quite a bit of flavour into the mix.


And the flavours of the chicken itself are greatly enhanced with the lemon and thyme that is inside. I think the butter I add inside, also helps to keep it moist.


We are pretty boring when it comes to what we serve our chicken with.  Its always the same.  But its what we enjoy.


Mashed potatoes, stuffing, swede (turnips), carrots and peas.  Simple.  You can't get much better than this!

Classic Roast Chicken & Gravy

Classic Roast Chicken & Gravy

Yield: 4
Author:
Nothing is more comforting than a delicious dinner of Roast Chicken and vegetables. Crisp skin on the outside, and succulent, flavourful, tender and juicy meat on the inside. This is my way of achieving just that. Lemon and Garlic bring out the best in chicken. The three just go together like peas and carrots!

Ingredients:

  • 1 medium sized roasting chicken, about 1 1/2 kg in weight (about 3 pounds)
  • 2 carrots, roughly chopped
  • 1 onion, peeled and roughly chopped
  • 1 stick celery, roughly chopped
  • 6 cloves garlic, bruised
  • 1 unwaxed lemon, halved
  • 4 TBS butter
  • olive oil
  • 3 sprigs of thyme
  • Sea Salt and cracked black pepper to taste
For the gravy:
  • 1 TBS plain flour
  • 250ml chicken stock (1 generous cup)

Instructions:

How to cook Classic Roast Chicken & Gravy

  1. Pre-heat the oven to 190*C/375*F/gas mark 5.  Scatter the chopped vegetables and garlic in the bottom of a roasting tin with sides, large enough to hold the chicken.
  2.  Season the chicken well inside with salt and pepper. Put  the lemon halves, 1 TBS of butter and the thyme into the cavity of the chicken. Place the whole chicken on top of the vegetables and garlic in the roasting pan. Rub the remaining butter over the breast and legs. Dust the whole thing with some salt and pepper and drizzle with some olive oil. Place in the heated oven.
  3. Roast, uncovered and undisturbed, for approximately 1 hour and 25 minutes, or until the juices run clear when pierced with a fork.
  4. Remove from the oven, carefully remove the chicken from the pan to a serving platter, loosely tent, and let it sit to rest for about 10 to 15 minutes before serving.
  5. While the chicken is resting make the gravy.  Strain the juices from the roasting tin to a saucepan and place over a low flame, then stir in the 1 TBS of flour.  Allow it to cook and sizzle until it turns a light golden brown. Gradually whisk in the chicken stock, whisking constantly until you have a thickened sauce.  Simmer for 2 minutes to cook out any flour taste.  Taste and adjust seasoning as desired.
  6. Slice the chicken and serve hot with your favourite vegetables on the side and the gravy for spooning over top.

Did you make this recipe?
Tag @marierayner5530 on instagram and hashtag it #EnglishKitchen
Created using The Recipes Generator


We are now living in a new world.  I'm not sure I like it. I hope we don't have to live like this for too long, but they are saying it will most likely be at least three months for those who are elderly and with underlying health problems, which would be us. 😲 


Selasa, 17 Maret 2020

Lemon Puff Biscuits


One of my favourite things to eat has always been the Lemon Puff Biscuits/Cookies that you can get in the shops.  I love lemon anything anyways, but  . . .  


there is just something totally irresistable and moreish about these treats . . . with their flaky cookie/cracker-like pastry . . .  and that yummy lemon filling.  I could eat a whole pack of them myself.  Trust me, I don't, but I could!  I just find them that yummy!


I found myself craving them today.  You know how that goes.  Sometimes you just crave something that you haven't had for a while.  I haven't seen any in the shops the last while to be honest.


I did have a packet of ready rolled all butter Puff Pastry in the freezer though, and I got to thinking to myself today, why couldn't I just use that?  Why indeed!


I cut it into 1 by 3 inch rectangles . . . I can't tell you how many I got exactly because I didn't count them and some have um . . .  disappeared in the interim between my baking and filling them, and my sitting down to write this. 


Both Todd and myself have been picking at them. So much for him saying he doesn't like lemon.  Pah!  Methinks he likes it well enough!


The ones you buy in the shops are glazed with something and so I glazed mine with a mix of egg white, caster (fine) sugar and lemon juice, prior to sprinkling them with a touch of demerara sugar for crunch, and then baking them in a hot oven.  This worked beautifully.  


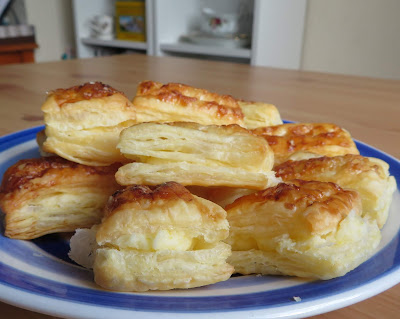
They came out lovely and light and perfectly golden brown with a lovely crunchy sheen/topping.


It was very easy to split them in half and fill them with a lush lemon flavoured buttercream.  Do wait for them to cool completely before you do this.  You don't want the butter cream to melt.


I wanted to be a bit generous with the filling. You almost can't see it here because it is quite a pale buttery colour, but believe me when I say that it is there . . . .


Oh boy  . . .  that combination of crisp  sweetly crunchy puff pastry and that rich lemon buttercream are a beautiful combination.  Simply beautiful  . . .


Such a beautiful thing to enjoy on a day such as this when you just want to put all that is happening in the world out of your mind  . . .  you just want to sit back with a hot cuppa and a breath of something slightly indulgent and sweet . . .


And these do fit the bill perfectly!  Just look at all of those flakey layers  . . . .


And that wonderfully rich and indulgent buttercream filling . . .  it just melts in your mouth.


They went perfectly with my cup of herbal tea . . .  today it was mint . . . a lovely pick-me-up.


Of course days like this call for even more of an indulgence so I enjoyed my tea in my Susan Branch Bluebird Mug.  I hardly ever use the mug.  Its so beautiful and I am afraid of  breaking it, but then again what is the point of having something beautiful and never using it.  Why indeed!


Lemon Puff Biscuits

Lemon Puff Biscuits

Yield: Makes quite a few
Author:
I was craving my old favourite Lemon Puffs, and decided to make my own. If anything I think these are even better.

Ingredients:

For the pastry
  • 1 sheet of ready roll all butter puff pastry
  • 1 large free range egg white
  • 2 tsp caster sugar (fine granulated)
  • the juice of 1/2 lemon
  • demerara sugar for sprinkling (turbinado)
For the filling:
  • 100g butter, softened (8 TBS)
  • 200g icing sugar, sifted (1 1/2 cups)
  • the finely grated zest of one unwaxed lemon
  • the juice of 1/2 lemon

Instructions:

How to cook Lemon Puff Biscuits

  1. Preheat the oven to 200*C/400*F/ gas mark 6.  Line several baking sheets with baking paper.  Set aside.
  2. Unroll your puff pastry. Cut it into rectangles roughly 1 inch by 3 inches in size. Place them onto the baking sheets, leaving some space in between each.
  3. Lightly whisk together the egg white,  sugar and lemon juice. You don't want it to turn foamy.  Using a pastry brush, brush some of this on top of each piece of pastry.
  4. Bake in the preheated oven for 12 to 15 minutes until golden brown. Don't let it burn, so keep an eye on it.
  5. Scoop off onto a wire rack to cool completely.
  6. To make the filling, beat together all of the ingredients until smooth.  Take care not to add too much lemon juice, you want a thick spreadable mixture.
  7. Split the baked pastries in half through the middle.  Spread a portion of the filling onto the bottoms of each one and top with the top pastry bit, sugared side up.
  8. Store any leftovers in an airtight container.

Did you make this recipe?
Tag @marierayner5530 on instagram and hashtag it #EnglishKitchen
Created using The Recipes Generator


Hot Mint Tea, Bluebirds, Susan Branch and Lemon Puffs . . .  it truly doesn't get much better than this!


Senin, 16 Maret 2020

Fish Stick Casserole with Cheesy Vegetable Rice


Who could have even predicted a week or so ago that we would be living in the new world we are living in at the moment.  A world filled with uncertainty and fear.  For, the moment this is the new normal and we have no idea if things will ever be the same again.  I am hopeful that they will be, but only the man upstairs knows  for sure.


Todd and I decided last week that we were going to self-isolate for as long as it takes. Because he is 82, and a fairly recent cancer survivor, and we both have underlying health conditions, we feel it is the safest route to take for us and we are prepared for this in every way.


I have always kept a healthy store cupboard.  As members of the Church of Jesus Christ, we have have always been cautioned by our leaders to be prepared for emergencies. That means we have food storage to keep us for at least 2 months, 72 hour packs, etc.  It is not hoarding, just common sense, and we are prepared to share what we have with those who need it.  We all are.


We've been taught to store foods that we will use and to use what we store so that it is rotated regularly.  Again that only makes sense.  Because of our preparedness, we have no need to panic.  It makes me sad to see all the panic buying that is going on now and the hoarding.  I get that people are afraid, I really do, but what I see is panic mixed with greed and it doesn't paint a very pretty picture.


There are quite a few people who lack the means and the ability to stock up and I have seen photos of elderly people wandering around the shops unable to find even a small pack of loo roll.  That's just sad and I think unecessary.  Last week at Costco I saw people with their carts filled to overflowing with loo roll. Surely as a humanity we are better than that.  If you have more than you need, do the kind thing and share with those who don't.  This is the perfect opportunity for us to show love and compassion for one another.


As a couple who are self isolating we are still quite capable or ordering in things we need on line, fresh items like meat and poultry, fruit and veg and fish. I get my frozen fish from an online fish monger called Seafresh. They are just brilliant and have not only fish, but also  meat and poultry.  They also have a line of oven ready items such as Lasagna's, Wellingtons, Chicken Goujons, Pies, Battered Fish Portions, Crisp Bakes, etc.


Today I used some of their Cod Jumbo Battered Fish Fingers to create a delicious store cupboard casserole for us.


Their Jumbo Fish Fingers are not like regular fish fingers. They are much larger and made with delicious white Cod, just cod nothing else, and are coated in a light crispy golden batter.  they are quick to cook from frozen and are perfect for casseroles such as the one I am sharing with you today! We love, LOVE them!


This casserole is a very simple bake that goes together in a flash and is oh-so-delicious when its done. I hasten to add that children just love it.


You have a creamy base of cooked rice, mixed with evaporated milk (you could use cream or half and half if you aren't bothered by calories), a small amount of  creamy ranch salad dressing, grated cheese and a quantity of frozen vegetables.


Today I used frozen peas, corn and green beans, but you can use whatever vegetables your family enjoys.  You can also cook vegetables from fresh to use, or even use drained tinned vegetables.


You could leave out the vegetables altogether and just use a tin of drained chopped tomatoes, which would also be nice.  Especially if you traded out the Ranch Dressing for a creamy Italian and replaced some of the cheese with a grated Parmesan.


In short it is very adaptable to what you have on hand and what kinds of things your family likes to eat.  If you use these jumbo fish sticks/fingers you will find that one of them is  the perfect size for one person.


This is a casserole that also reheats well the day after if you are a smaller family, or very easily cut in half if you are not a couple who enjoys leftovers.  Its very forgiving to say the least.


We enjoyed it with an Oriental Chopped Salad on the side.  It went down a real treat! I am so very grateful that in this day and age we have these options available to us, that we can do our shopping online if we choose, very quickly and easily.  What a special blessing!

Fish Stick Casserole with Cheesy Vegetable Rice

Fish Stick Casserole with Cheesy Vegetable Rice

Yield: 4
Author:
This is quite simply delicious.  It makes a great use of store cupboard ingredients as well.

Ingredients:

  • 250g of cooked long grain rice (2 cups)
  • 180ml evaporated milk (3/4 cup)
  • 60ml creamy ranch salad dressing (1/4 cup)
  • seasoning to taste (I didn't use any)
  • 12 frozen fish sticks (if using the larger ones, then you only need one per serving)
  • 180g strong cheddar cheese, divided (1 1/2 cups)
  • 2 cups of frozen vegetables, cooked for 2 minutes in the microwave (I used corn, peas and green beans)

Instructions:

How to cook Fish Stick Casserole with Cheesy Vegetable Rice

  1. Preheat the oven to 190*C/375*F/gas mark 5.  Butter an 8 by 11 inch casserole dish.  St aside
  2. Mix together the rice, milk, salad dressing, 3/4 of the cheese, any seasoning as desired (remember cheese is salty) and the partially cooked vegetables.  Spread this in the prepared casserole dish.  Lay the frozen fish sticks on top.  Sprinkle the remaining cheese over all.
  3. Bake for 35 to 40 minutes until heated through, the fish sticks are cooked through and the casserole is golden brown.  Serve immediately.  A salad goes  nice on the side.

Did you make this recipe?
Tag @marierayner5530 on instagram and hashtag it #EnglishKitchen
Created using The Recipes Generator


As with any fish dish, quality speaks for itself.  When you are starting with really good fish, you really don't or shouldn't have to do very much to it to get the best from it.  The fish fingers from Seafresh are beautiful. I think they are the best I have ever eaten and that says a lot!  If you are looking for quality fish at a great price with a fabulous delivery service I can't recommend Seafresh highly enough!  Their product, delivery service, packaging and customer service are exemplary in my opinion and so is this recipe!! 
A few things about Seafresh:
  • Same Day dispatch on orders received before 1 PM.
  • All packages are carefully hand packed.
  • Free delivery on orders above £50, £8 on orders below that amount. 
  • Responsibly and sustainably sourced.
  • Air Blast Frozen at source within 4 hours of being caught.
  • Wide variety to choose from. 
Do check them out on their website to find out more.
Follow them on Facebook, Twitter and Instagram.

Note - Although I was gifted with product free of charge for the purposes of review, I was not required to write a positive review in exchange, nor would my integrity allow me to recommend anything if I did not truly like it. Any and all my opinions are my own entirely.